Some Things You Might Not Know — On Electronic Music, MIDI, VSTs, Audio Interfaces, Multitrack Recording, and More — A Glossary of Terms and New Terminology — from the perspective of a Renoise user (“chiptune” tracker musician).
Let’s assume that you are already familiar with what I am talking about. We know that generally people who make electronic music on Windows often use Ableton, Fruity Loops, or another horizontal timeline sequencer like Reaper or maybe a more self-contained environment like Reason, or some of the other alternatives. The reason that I use Renoise is that you can sequence notes within variably sized measures or passages efficiently through a different sized editstep [which is equivalent to deciding between quarter notes, eighth notes, sixteenth notes, etc], as well as see the Letter Name of NOTES immediately. Likewise, I like the sample editor functionality, ability to transpose instruments without changing the actual note-names [compare to transposing by shifting notes on the piano roll], compatibility with MOD files, and I feel like it is more stable as a VST host. I had used Ableton and Fruity Loops to some extent early on around 2009, so that introduced me to the idea of recording the MIDI sequence and Audio simultaneously. You can do this in Ableton by recording MIDI on one track and routing the audio to an audio track to record on there. Arming tracks while holding CTRL will help you accomplish this.
So to further expand on the idea of recording the MIDI and corresponding Audio simultaneously, let’s examine the purpose & goal of doing so. If you record the MIDI, i.e. the notes, note-offs, etc. then you can give those to another instrument so that you can replay the same sequence with a different generator, or modify the original instrument, or whatever. By recording the audio, you create an accurate record of what you heard at the time. The technique of recording both the MIDI and original audio as you are doing overdubs or a singular track is something which doesn’t have definite terminology that can be associated with a singular unique keyword. In fact, you will probably not have seen any discussions of this idea, or seen people use it in practice. Anyways, let’s move on to the next paragraph.
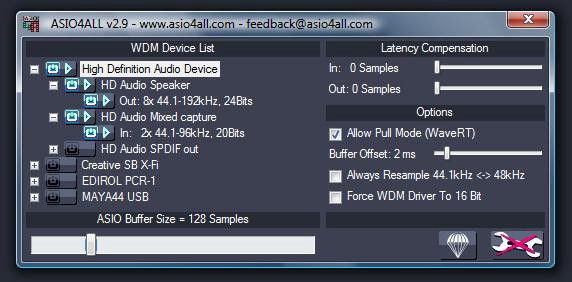
If you are recording things simultaneously, you would like them to be insync. This is the concept of multitrack recording, that you will have your things synced up already due to a roughly simultaneous time of track start. There exists dedicated hardware such as the Zoom H6 handy recorder that will do this. Since ultimately we are using a DAW [digital audio workstation], we want to achieve multitrack recording, in this case, on a Windows computer, reliably, and have everything in the DAW already. Unfortunately, there are some stumbling blocks for this. Ableton is unstable. ASio4All seems to crash catastrophically. In DAWs, without ASIO4ALL, we cannot use multiple USB audio devices simultaneously [except for the case of one output and one input device], and even if there is one input device with for example, 1&2, 3&4 tracks, we can only access one stereo pair of tracks at a time… without ASIO4ALL. What is ASIO4ALL? For the end user, it is this box. Who makes ASIO4ALL? Is it some large collection of elite programmers? No, I’m pretty sure it is one guy.
So, if we find that for whatever reason, we cannot use ASIO4ALL with our chosen DAW reliably enough for our purposes, what do we do, switch to Mac and use something like Logic Pro, Pro Tools, or Garage Band, where our VSTi synths built as VST2 32-bit dlls will obviously not work? Let’s just assume that we aren’t doing that.
So, get this, the workaround for simultaneous multitrack recording on Windows is simple. Use multiple programs that can record audio, and deal with resynchronization later. Much like what it probably was like making a multi-camera film in the early days, it is as simple as taking two misaligned strips of film & sound and shifting them one way or the other into the future or the past until they are aligned correctly. But why don’t any DAWs let you use multiple USB audio devices at the same time? Your guess is as good as mine. It is apparently due to some kind of synchronization error that can result from the sampling rate clock drifting between the two tracks leading to a crash? I don’t really know.
Just like how the concept of recording the MIDI & Audio for a played-in-the-box synth sequence is pretty unnamed, so too is the idea of recording the dry, wet, and differently miked tracks of a guitar or other rock instrument. How would we go about recording the dry and wet guitar inputs? I surmise we would split the dry signal using something like a headphone amp. Right, we might use a direct box. But I haven’t because I don’t have any XLR cables or a mixer… Just putting that out there. So what do we use, maybe [1/4" 4-way splitter]? Would be nice if it had individual volume controls. I suppose there is already a gain knob on the recorder or interface and a volume knob on the amp and effects, so maybe it doesn’t matter? haha. Maybe I’ll find some suitable equipment soon, who knows. So yeah, let me know your thoughts in the comments if something I said was really inaccurate, and maybe check out my new album from first quarter 2020, “tunes”, at http://yunowadidis.bandcamp.com/album/tunes . Also since it is related, take a look at this, which I guess I did prior to releasing my first album in 2012, since google notes the date as Feb 22, 2012: https://forum.pdpatchrepo.info/topic/6149/qwerty-keyboard-to-midi-patch-two-octaves-proper-note-off-handling
Anyways since there is a possibility that people will find this article in the future due to the usage of the keyword Renoise in the title, I will discuss my techniques with it. If you haven’t used it and don’t plan to, obviously you can skip this because you won’t get it. So let’s start. Usually I start out my songs working in the default 4 LPB. Later, if I want to, I will hit Ctrl+F9 to double the pattern size and scale the pattern the same amount. If you used any Delay values this will mess them up, so if you’re going to do this then do it early on. If you’ve hit Ctrl + F9 just once then that implies you will now have 8 LPB, so you can add ZL08 to your patterneffects column to define that. But 8LPB probably isn’t precise enough if you’re recording live [notes, not audio]. So you can hit it again to be at 16 LPB, at this point your default 64 Line pattern which was 4 measures of 4 quarter notes at 4 lines each will now be 256 lines where each quarter note is now 16 lines. Since each line’s delay precision is 0xFF or 256 or 255, then that means that a quarter note will be have 4096 precision for delay. So if your BPM were 120, you would have 120 quarter notes per 60 seconds, or 2 quarter notes per second, making your delay precision effectively 8192 Hz. Since the recording is done at 44100 Hz or 48000Hz or whatever, this isn’t high enough to achieve the magical frequency divided by two figure of 22050 Hz or 24000 Hz to avoid aliasing… but that’s assuming that it’s analogous to the audio waveform, which it’s not. The glitch I’m trying to avoid by increasing LPB is when at a low LPB the note-offs don’t even get recorded. It seems that still at 16 LPB our precision really isn’t even enough, so maybe we could use 32 LPB sometime and see if that’s better. Haha. Moving on.
Keyboard shortcuts. They’re crucial. In Renoise, I have altered just a few of them from defaults. I have Alt + R set to go Instrument Up, and Alt + F set to go Instrument Down. I have Ctrl Shift A for Octave Up and Ctrl Shift Zfor Octave Down. I like to set Minus [-] to “Move to Previous Row with EditStep”, and [‘] singlequote to Move to Next Row with EditStep. A good thing to know is that F9, F10, F11, and F12 jump to the 0%, 25%, 50%, and 75% line positions, which will at the beginning correlate directly to the 1st 2nd 3rd and 4th beats. Of Course, Shift + Space will start playback from the current line, and Enter will play only one line at a time, like stepping through a video frame by frame. If you are using samples and you haven’t enabled Autoseek then if you start playback from after the start of the sample-based note-on, then you won’t hear anything, yet if you do, then you can accurately hear what everything should be sounding like at that point in time. This doesn’t hold true for instruments since there is no facility to do such a thing. Backtick or Tilde should open the instrument box. It didn’t work the same way for me after a certain version after they added plugin sandboxing so I’ve just been using Renoise 2.82. So……. there’s a lot of other features and tricks I could talk about, but I use them pretty infrequently, so I’ll just talk about two more things. One: the MIDI Input uncollapse arrow button will uncollapse that section at the bottom when Instrument Settings is active. Here you can choose a MIDI device and assign it to a specific track. By doing this you can actually record one device to multiple tracks, or multiple devices to multiple tracks at the same time. In practice I don’t use this because I don’t even have my MIDI controller hooked up. I just play everything on the PC keyboard at maximum 7F velocity like a goon. Okay, two more things. You can automate the On/Off of effects into the PatternFXColumn by right clicking on the on/off button. Effects plugins do not magically automate when you drag their dials in the UI, so you can automate them by right clicking the sliders in the Renoise interface instead. Ctrl+RightClick & Drag to make finer adjustments. By default they will automate as Points and you probably don’t want that so you’ll have to change that to Linear or Curve. If you want to use the *LFO effect one great thing to know is that if you right click Reset, that will automate that reset event into the patterneffectscolumn. Okay, one more thing. You can hit Enter on the tracks in the block view editor thing, then they’ll have an X over them, and they won’t play. This overrides even the Play/Off/Solo status of the tracks, so you can leave a track on Play, disable it for one pattern, and then it will still play in other patterns, and you will still have the referenceable note information there if you want to do something with it later. Anyways, pattern effects are really cool. Take a look at this picture as you read what is below.
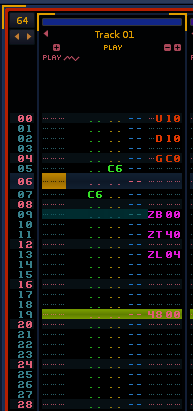
The U10 effect does a pitch slide upwards by 1 semitone [the distance between C and C#]. The D10 effect does a pitch slide downwards by 1 semitone. Obviously the number is hexadecimal so D20 would slide down by 2 semitones, U18 would slide up by 1.5 semitones, etc. The GC0 command there does a glide by up to 12 semitones from the previously playing note to the note indicated on that same line. or i think they might call it a glissando effect. There’s no notes here but I’m not revising that picture so haha. Obviously, these tracker pattern effects will only work if you are using sample based instruments! Now look at the C6 command. Put that on a line and the note will be cut after 6 “Ticks” i think they call them, and there are 12 per line. Now check out the ZB00 command. That does a pattern break, skipping the rest of the pattern and going to the next. the ZT40 line sets the tempo to 0x40 which is I guess is 64. That’s probably too low but maybe you wanna do things in double time. I don’t even know what that really means! hahaahaha Anyways the ZL04 sets the LPB to 4 which is the default. Other good settings for it are ZL08, ZL10, and ZL0C. That 12 LPB setting or maybe 24 instead is nice because you can make some kinds of triplets without using the delay (blue) column. Usually the pan column is yellow, delay is blue, and volume/velocity is green. If you hit Ctrl-Shift-D,V,orP then those will hide or show. Okay cool. So anyways, CapsLock inserts a NoteOff, and CtrlCapslock inserts an entire row of note-offs into the current track. The little plus arrow button will let you get more note tracks and more effectscolumn tracks. If you right click on the thing that says Play at the top it will change to Solo, and if you left click when it says Play it will instead be changed to Off. Okay now let’s describe a few facts about the native effects. There are Effects, Meta, and Routing.

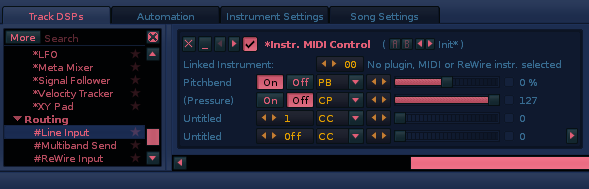
What the Line Input effect does is it echos your recording device into the track. In practice I don’t use this in songs, but if you want to monitor what your guitar sounds like with the effects on, while you are recording it dry, then you can do it with this. Of course there’s some delay. So you can just use it for general fockery. Anyways the signal follower effect is really cool, but I’ll just talk about two more, Instr. Automation, and Instr. MIDI Control. Instr Automation is the only way you can automate your VSTi’s. You’ll do this by right clicking, ctrl-right-clicking sliders, etc. There is a box that refers to the instrument number that you can change. You will probably want to just right click on everything to initialize the values to what you want them to be at that point in the song, but you would have figured that out on your own. Anyways the Instr. MIDI Control is how you can get pitchbends. That’s pretty basic, but if you want to use the modwheel you have to put 1 into this CC box.
Okay so I also told myself I would go over some rare Windows keyboard shortcuts for your benefit, so here goes. Alt+Space opens the Restore Move Size Minimize Maximize menu for the window, at this point you can hit R, M, S, N, or X, or C, which do different things that are already indicated. If you hit S then you can use the arrow keys to start resizing and then use the mouse! And same with M, you need to first use the arrow keys once and then you can use the mouse. Anyways here are just a few more tricks. Ctrl + Click on the Taskbar icons to immediately open the stacked windows sequentially. Shift+Click will open a new instance of that program. Also Ctrl+Win+1–9 will immediatley activeate those windows. The typos are for searchengineoptimization. One other cool thing is Shift Right Click on an empty space in an explorer window and you can hopefully open a command prompt there. And if you +{RButton} (that’s the shorthand for shift right click) on a file then you can Copy As Path. That’s cool cause you can paste the file path directly into the [File Name] textbox in the windows system native File Open / File Save dialogs. IF you don’t see underlined “accelerator key” hints then you should enable those. Anyways here’s some examples of commands you can Run, which you can open with #r [win + r]:
[explorer .] <- actually try typing this into the location bar of an explorer window, it works there too, and of course when you’re in a directory in cmd and want to open an explorer window there, [taskkill /f /im googleupdate*], [cmd /k start], [services.msc], [secpol.msc], [diskmgmt.msc], [devmgmt.msc], [fsmgmt.msc].
Anyways, windows search and indexing is terrible. You can use this utility which is more like an excellent file manager, called Everything Search Engine, from voidtools.com . The guy that made it is called David Carpenter. If you use this you can of course do really quick searches for like, *.exe, or *.doc, or *.xrns, or whatever, and find all of those files and sort them however, perhaps by Date Created. This would be good for your creative productivity because now you can just locate files based solely on the elements of the filename that you can remember. No more losing files.
Okay anyways here are some program names: XNView [can use this to take screenshots by pressing a button], Traktor2 version 2.0.1.10169, mp4muxer, Geany, notepad++, notepad3, Oracle VM Virtualbox, “physical to virtual, virtual to physical, p2v, v2p +migration”, EASEus partition manager, paragon backup and recovery, Avidemux 2.6, PuTTY + Xming “X windows forwarding”,WinSCP, FileZilla, “windows sysinternals utilities”, “nirsoft utilities”, Seamonkey (if you want to copy and paste html from the browser and save it separately from saving the entire page), Honeyview, Virtual Audio Cable, Midi-Ox, Bome’s Midi Translator, PhotoPea [it’s crazy but it is a free online image editor that works exactly like photoshop, even exports .psd files, has exactly the same keyboard shortcuts and everything], UniserverZ, Ampache, Icecast, Edcast, Winamp5, Musicbee, Foobar2000, x64dbg, Geany, Audio Router, Autohotkey, dxwnd, MilkyTracker, ModPlugTracker / OpenMPT, ComboFix, hijackthis.exe, DriveImageXML, d3doverrider, d3dwindower, dede, dnstester, fastcopy, gpuz, hdasm, hiew7.51,ollydbg1.10, pixperan, portablecolemakahk, aquakeytest, xpadder, unetbootin, w32dasm, webripper, tsearch, sharpkeys, rinput12, osiva, samexe.exe, vundofix, JavE, TriplePlay, sandboxie, dosbox, D.o.g [frontend], vice emulator, winuae, xmplay, bizhawk / emuhawk [use it for psx], zsnes, snes9x, visualboyadvance
okay cool, here are some websites: bandcamp.com/artist_index , soundcloud.com , directory.shoutcast.com , cafecody.com , last.fm , jamendo.com , mixcloud.com , itch.io , indiexpo.com , warpdoor.com , indiegamecurator.com , indiegames.com/blog , tigsource.com , processing.org , p5js.org , threejs.org , babylonjs.com , vst4free.com , shadertoy , codepen.io , zophar , demozoo, pouet, dailymotion.com , vimeo.com
Also some other info is that I think if you look at my profile on youtube you can see a list of channels I am subscribed to. I have two profiles so this applies to one of them.
Okay cool, I’m done with this for now, hope you found this information helpful!